By default, DaDesktop isn't configured to support audio, but this can be supported in order to connect the desktop with audio, by the use of rfbproxy.
Rfbproxy is a proxy that enables WebSockets and audio.
For Linux:
1. Install and configure vncserver
We recommend installing x11vnc on the Linux system. The following are the recommended settings for x11vnc:
cat > /etc/xdg/autostart/x11vnc.desktop << EOF
[Desktop Entry]
Type=Application
Exec=/usr/bin/x11vnc -N -no6 -rfbportv6 -1 -allow 10.0.3.1,127.0.0.1
-nopw -shared -alwaysshared -forever -repeat -nowireframe -noscr
-nocursorshape -skip_lockkeys -cursor_drag -grab_buster -deferupdate
10 -speeds 6000,5000,20
Hidden=false
X-MATE-Autostart-enabled=true
X-MATE-AutoRestart=true
Name[en_US]=X11VNC
Name=X11VNC
Comment[en_US]=Share desktop over VNC
Comment=Share desktop over VNC
EOF
Important:
1. The settings above assume that your desktop environment is MATE. If you are using another, such as Gnome, you may need to make some changes.
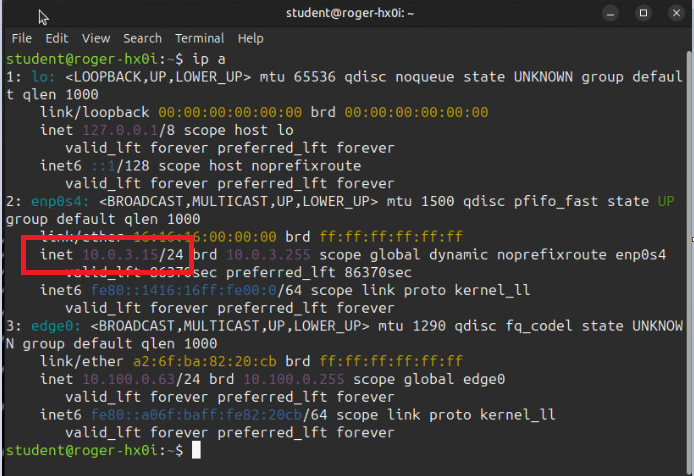
2. rfbproxy will connect to the vnc server (rfb-server ) from the local address 127.0.0.1. If you install other vnc server, you should modify the vnc server settings to allow connections
from 127.0.0.1(rfbproxy) and 10.0.3.1 (dd node host).
2. Compile rfbproxy
The following commands can be run from your home directory using any normal Terminal. MATE Terminal is available from the System Tools menu. We use a small bash script called Rust-up instead of Rust from the distribution repos.
sudo apt install -y libssl-dev libmp3lame-dev
curl --proto '=https' --tlsv1.2 -sSf https://sh.rustup.rs | sh
(Choose Option 1 for default install)
git clone https://github.com/allinan/rfbproxy
cd rfbproxy
source $HOME/.cargo/env
(This allows the shell to take into account the rust install)cargo build --release
(NB there is a warning shown when running this command, but this can be ignored)sudo cp target/release/rfbproxy /usr/bin/
3. Run rfbproxy
Command to run rfbproxy:
rfbproxy --enable-audio --address=0.0.0.0:5905 --rfb-server=127.0.0.1:5900
--allow=10.0.3.1
Note:
-
"--address":The hostname/ip and port in which the rfbproxy will bind. For dadesktop, listening port must be set to 5905.
-
"--rfb-server": The hostname/ip and port where the local vnc server is listening.
-
--allow: The client ip that is allowed to connect to rfbproxy. The setting here is --allow 10.0.3.1, which means that only the dd node host is allowed to access to rfbproxy.
Configure rfbproxy autostart:
The following can be optionally used so that each time the dadesktop machine starts the rfbproxy is started automatically.
The settings below assume that your desktop environment is MATE. If you are using another desktop, you may need to make some changes.
cat > /etc/xdg/autostart/rfbproxy.desktop << EOF
[Desktop Entry]
Terminal=false
Type=Application
Exec=/usr/bin/rfbproxy --enable-audio --address=0.0.0.0:5905 --rfb-server=127.0.0.1:5900
--allow=10.0.3.1
Hidden=false
X-MATE-Autostart-enabled=true
X-MATE-AutoRestart=true
X-MATE-Autostart-Phase=Applications
X-MATE-Autostart-Delay=1
Name[en_US]=RFBPROXY
Name=RFBPROXY
Comment[en_US]=Proxy desktop VNC and Audio
Comment=Proxy desktop VNC and Audio
EOF
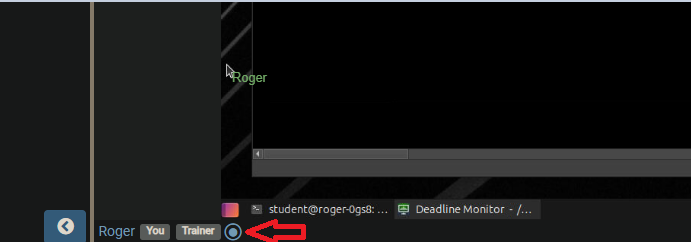
4. Connect to desktop and enable audio
If everything is set up correctly, after you connect to the desktop, you will see an audio icon in the bottom left corner, click it to toggle audio.
For Windows:
1. Configure vncserver
Install vncserver on the guest machine, Tightvnc is recommended. Configure vncserver to allow local(127.0.0.1) access.

2. Download rfbproxy for windows
Download rfbproxy for windows, unzip and copy the rfbproxy folder to the root of disk c, now we have rfbproxy related files in c:\rfbproxy.
3. Create rfbproxy service
Run the following cmd as administrator. It will create a service called rfbproxy, the parameters in the command can be modified as needed
sc create rfbproxy binpath="C:\rfbproxy\rfbproxy.exe --enable-audio
--address=0.0.0.0:5905 --rfb-server=127.0.0.1:5900 --allow=10.0.3.1"
type=own start=auto depend=tvnserver displayname=rfbproxy
4. Install virtual audio device
Download and install a virtual audio device, such as Scream (open source)、Voicemeter (Donationware).
If you installed Scream, you'd better change multicast to unicast. Right click the registry file "ScreamUnicast.reg", then click mege.

If you installed Voicemeeter, no settings are required, but you need to consider using it may require a license.
5. Restart
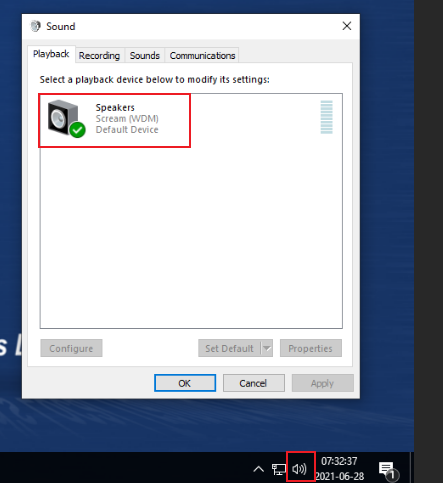
Restart the guest machine. You should be able to see the playback device of SCREAM or VOICEMEETER.
If everything is set up correctly, after you connect to the desktop, you will see an audio icon in the bottom left corner, click it to toggle audio.